Secure Grafana with Pomerium
What this guide does
Put Grafana behind Pomerium to gate it with SSO and route policy, then pass a signed identity JWT that lets Grafana sign users in automatically. Grafana verifies that JWT on each request, so there's no second login prompt or separate Grafana password for users.
When to use this guide
Use it when you want one front door for Grafana with your existing identity, and you want Grafana to trust Pomerium for authentication instead of running its own login. If you only need to reach Grafana over a private network without browser SSO, a plain TCP route is a better fit.
Prerequisites
This guide assumes you've completed the Quickstart, so you already have Pomerium running and signing users in through the hosted authenticate service.
You also need:
- Docker and Docker Compose
- A domain you control for the Grafana route (this guide uses
grafana.yourdomain.com)
This guide uses the hosted authenticate service so you don't have to run an IdP. To run your own instead, follow Keycloak + Pomerium and swap the authenticate_service_url / idp_* settings into the config below.
Configure Pomerium
- Pomerium Zero
- Pomerium Core
In the Zero Console:
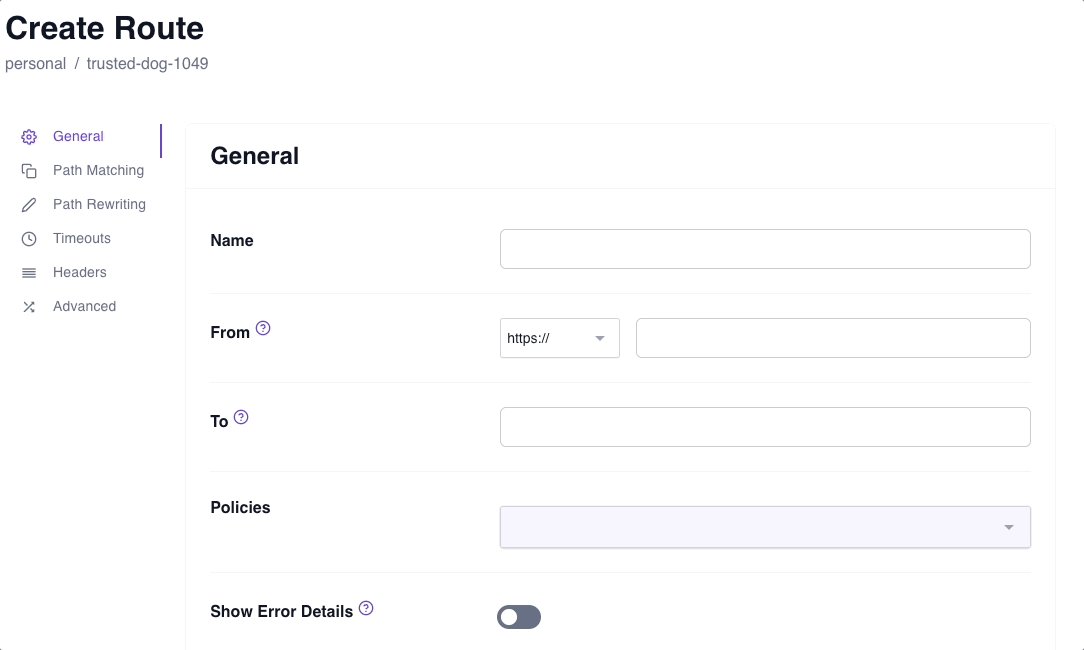
-
Create a Route. In From, enter
https://grafana.<your-starter-domain>; in To, enterhttp://grafana:3000. -
Set the policy to Any Authenticated User.
-
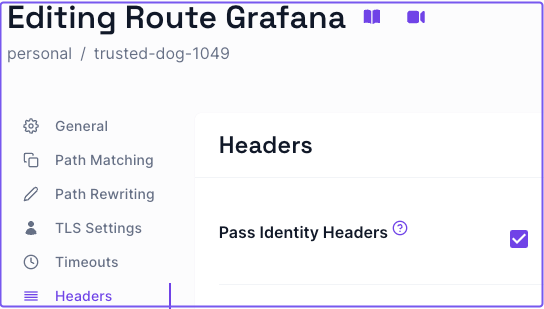
On the Headers tab, enable Pass Identity Headers and save.
Zero manages the route's TLS certificate and the signing key behind its starter domain, so Grafana's JWKS URL is your authenticate service: https://authenticate.<your-starter-domain>/.well-known/pomerium/jwks.json. Use that value for GF_AUTH_JWT_JWK_SET_URL in the next section.
Create a config.yaml. It routes grafana.yourdomain.com to the Grafana container, passes identity headers, and sets a signing_key so Pomerium publishes a JWKS that Grafana can verify the forwarded assertion against.
# Pomerium Core configuration for Grafana. Uses the hosted authenticate service, so
# you don't run your own identity provider. To self-host the IdP, see the Keycloak
# guide: https://www.pomerium.com/docs/integrations/user-identity/oidc
authenticate_service_url: https://authenticate.pomerium.app

# Obtain TLS certificates automatically from Let's Encrypt.
autocert: true

# Signs the identity assertion Pomerium forwards to Grafana, and is published at the
# route's /.well-known/pomerium/jwks.json for Grafana to verify against. Generate
# your own and keep it secret:
#   openssl ecparam -genkey -name prime256v1 -noout | base64
signing_key: REPLACE_WITH_BASE64_ENCODED_EC_P256_PRIVATE_KEY

routes:
  - from: https://grafana.yourdomain.com
    to: http://grafana:3000
    pass_identity_headers: true
    policy:
      - allow:
          or:
            - email:
                is: you@example.com
Replace grafana.yourdomain.com with your domain, you@example.com with your email, and generate your own signing_key with the command in the comment. With Core, Grafana's JWKS URL is the route's own well-known endpoint (https://grafana.yourdomain.com/.well-known/pomerium/jwks.json), which is what the Compose file below uses.
Configure Grafana
Grafana's JWT authentication reads the assertion Pomerium forwards and signs the user in. The key settings:
GF_AUTH_JWT_HEADER_NAME=X-Pomerium-Jwt-Assertion— the header Pomerium sends the signed identity JWT in.GF_AUTH_JWT_JWK_SET_URL— where Grafana fetches Pomerium's public keys to verify the JWT (see the URL for your path above).GF_AUTH_JWT_EMAIL_CLAIM/GF_AUTH_JWT_USERNAME_CLAIM=email— which claim becomes the Grafana account.GF_AUTH_JWT_AUTO_SIGN_UP=true— create the Grafana user on first sign-in.
Run the stack
The Compose file below runs Pomerium and Grafana together. Wire up Pomerium for your deployment, then start the stack:
- Pomerium Zero
- Pomerium Core
Drop the pomerium service and use the compose.yaml from the Quickstart with your POMERIUM_ZERO_TOKEN, keeping the grafana service shown below.
Keep the pomerium service shown below and place the config.yaml from the previous step next to this docker-compose.yaml.
services:
  pomerium:
    image: pomerium/pomerium@sha256:e10d1d267af24f581157f485d9b0bc08469e2428675b696a08e42ceb09b2279c # v0.32.7
    volumes:
      - ./config.yaml:/pomerium/config.yaml:ro
      - pomerium-cache:/data
    ports:
      - 443:443
      - 80:80
    restart: always

  grafana:
    image: grafana/grafana@sha256:8b37a2f028f164ce7b9889e1765b9d6ee23fec80f871d156fbf436d6198d32b7
    environment:
      - GF_AUTH_JWT_ENABLED=true
      - GF_AUTH_JWT_HEADER_NAME=X-Pomerium-Jwt-Assertion
      - GF_AUTH_JWT_EMAIL_CLAIM=email
      - GF_AUTH_JWT_USERNAME_CLAIM=email
      - GF_AUTH_JWT_JWK_SET_URL=https://grafana.yourdomain.com/.well-known/pomerium/jwks.json
      - GF_AUTH_JWT_AUTO_SIGN_UP=true
      - GF_AUTH_JWT_CACHE_TTL=60m
      - GF_AUTH_SIGNOUT_REDIRECT_URL=https://grafana.yourdomain.com/.pomerium/sign_out
    volumes:
      - grafana-storage:/var/lib/grafana
    restart: always

volumes:
  pomerium-cache:
  grafana-storage:
docker compose up -d
Verify the setup
-
The route requires authentication. In a fresh browser, open
https://grafana.yourdomain.com. You should be redirected to sign in, not straight into Grafana. -
An allowed user gets in. Sign in. Pomerium redirects you back to Grafana.
-
JWT SSO works. Grafana signs you in automatically. Open
/profileand confirm your name, email, and username show Synced via JWT.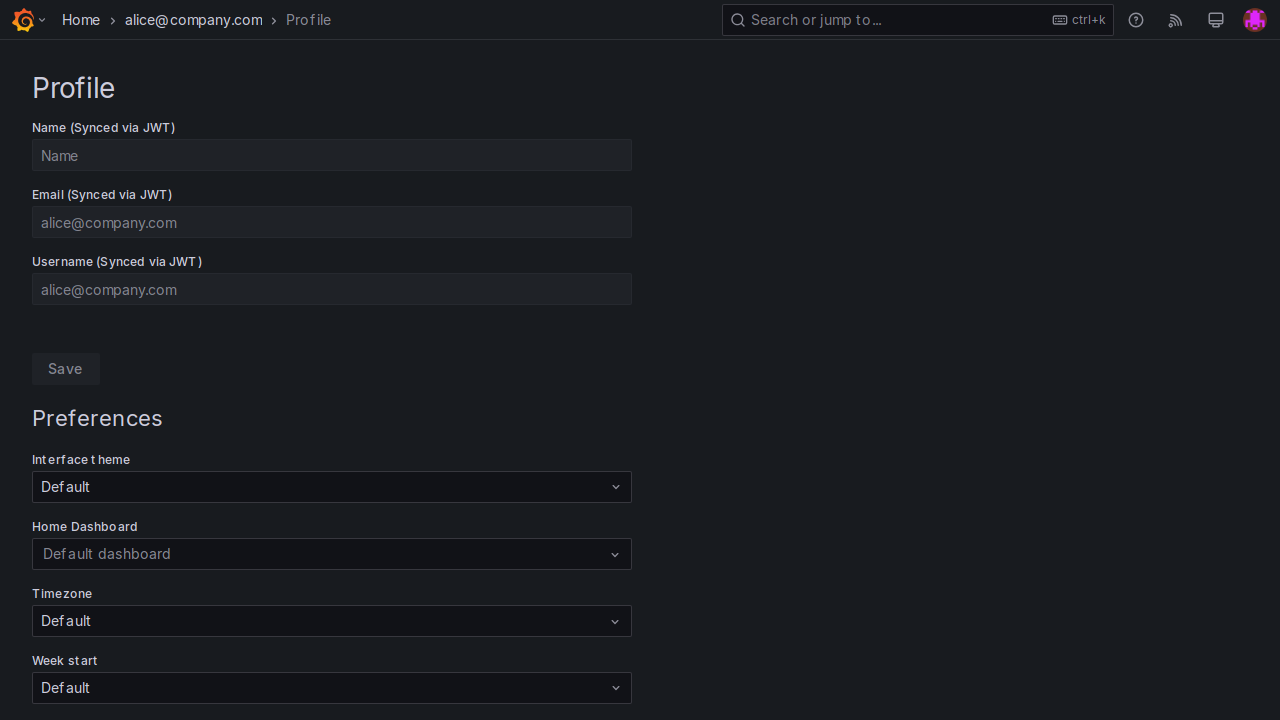
-
A disallowed user is blocked. Sign in as a user your policy excludes and open
https://grafana.yourdomain.com. Pomerium denies access, so no JWT is forwarded and you never reach Grafana.
Common failure modes
- Grafana shows its own login form instead of signing you in. The JWT didn't verify. Check
GF_AUTH_JWT_JWK_SET_URLis reachable from the Grafana container and that Pomerium has asigning_key(Core) so the JWKS isn't empty. failed to verify JWT: no keys foundin Grafana logs. Same cause: no published signing key. Generate and setsigning_keyinconfig.yaml.- Redirect loop or certificate errors. Make sure DNS for
grafana.yourdomain.compoints at Pomerium and that Pomerium can obtain a TLS certificate. On the Core path,autocertneeds ports 80 and 443 reachable for Let's Encrypt; Zero manages certificates for you.
Security considerations
- Grafana trusts any request carrying a JWT it can verify, so don't expose Grafana directly — only Pomerium should reach
grafana:3000. Keep it off published ports and on the internal Docker network. GF_AUTH_JWT_AUTO_SIGN_UP=truegrants a Grafana account to every user your Pomerium policy allows. Scope the route policy (group or domain) to who should have access, and manage Grafana org roles separately.